Friday, December 18, 2009
Thursday, December 17, 2009
117 Run Commands In Windows Xp
Accessibility Controls - access.cpl
Accessibility Wizard - accwiz
Add Hardware Wizard - hdwwiz.cpl
Add/Remove Programs - appwiz.cpl
Administrative Tools - control admintools
Automatic Updates - wuaucpl.cpl
Bluetooth Transfer Wizard - fsquirt
Calculator - calc
Certificate Manager - certmgr.msc
Character Map - charmap
Check Disk Utility - chkdsk
Clipboard Viewer - clipbrd
Command Prompt - cmd
Component Services - dcomcnfg
Computer Management - compmgmt.msc
Control Panel - control
Date and Time Properties - timedate.cpl
DDE Shares - ddeshare
Device Manager - devmgmt.msc
Direct X Troubleshooter - dxdiag
Disk Cleanup Utility - cleanmgr
Disk Defragment - dfrg.msc
Disk Management - diskmgmt.msc
Disk Partition Manager - diskpart
Display Properties - control desktop
Display Properties - desk.cpl
Dr. Watson System Troubleshooting Utility - drwtsn32
Driver Verifier Utility - verifier
Event Viewer - eventvwr.msc
Files and Settings Transfer Tool - migwiz
File Signature Verification Tool - sigverif
Findfast - findfast.cpl
Firefox - firefox
Folders Properties - control folders
Fonts - control fonts
Fonts Folder - fonts
Free Cell Card Game - freecell
Game Controllers - joy.cpl
Group Policy Editor (for xp professional) - gpedit.msc
Hearts Card Game - mshearts
Help and Support - helpctr
HyperTerminal - hypertrm
Iexpress Wizard - iexpress
Indexing Service - ciadv.msc
Internet Connection Wizard - icwconn1
Internet Explorer - iexplore
Internet Properties - inetcpl.cpl
Keyboard Properties - control keyboard
Local Security Settings - secpol.msc
Local Users and Groups - lusrmgr.msc
Logs You Out Of Windows - logoff
Malicious Software Removal Tool - mrt
Microsoft Chat - winchat
Microsoft Movie Maker - moviemk
Microsoft Paint - mspaint
Microsoft Syncronization Tool - mobsync
Minesweeper Game - winmine
Mouse Properties - control mouse
Mouse Properties - main.cpl
Netmeeting - conf
Network Connections - control netconnections
Network Connections - ncpa.cpl
Network Setup Wizard - netsetup.cpl
Notepad notepad
Object Packager - packager
ODBC Data Source Administrator - odbccp32.cpl
On Screen Keyboard - osk
Outlook Express - msimn
Paint - pbrush
Password Properties - password.cpl
Performance Monitor - perfmon.msc
Performance Monitor - perfmon
Phone and Modem Options - telephon.cpl
Phone Dialer - dialer
Pinball Game - pinball
Power Configuration - powercfg.cpl
Printers and Faxes - control printers
Printers Folder - printers
Regional Settings - intl.cpl
Registry Editor - regedit
Registry Editor - regedit32
Remote Access Phonebook - rasphone
Remote Desktop - mstsc
Removable Storage - ntmsmgr.msc
Removable Storage Operator Requests - ntmsoprq.msc
Resultant Set of Policy (for xp professional) - rsop.msc
Scanners and Cameras - sticpl.cpl
Scheduled Tasks - control schedtasks
Security Center - wscui.cpl
Services - services.msc
Shared Folders - fsmgmt.msc
Shuts Down Windows - shutdown
Sounds and Audio - mmsys.cpl
Spider Solitare Card Game - spider
SQL Client Configuration - cliconfg
System Configuration Editor - sysedit
System Configuration Utility - msconfig
System Information - msinfo32
System Properties - sysdm.cpl
Task Manager - taskmgr
TCP Tester - tcptest
Telnet Client - telnet
User Account Management - nusrmgr.cpl
Utility Manager - utilman
Windows Address Book - wab
Windows Address Book Import Utility - wabmig
Windows Explorer - explorer
Windows Firewall - firewall.cpl
Windows Magnifier - magnify
Windows Management Infrastructure - wmimgmt.msc
Windows Media Player - wmplayer
Windows Messenger - msmsgs
Windows System Security Tool - syskey
Windows Update Launches - wupdmgr
Windows Version - winver
Windows XP Tour Wizard - tourstart
Wordpad - write
15 Top Windows XP secrets
· Useful key shortcuts available:
* Windows key + D - shows the desktop.
* Windows key + M - minimizes all open windows.
* Windows key + Shift + M - maximizes all open windows.
* Windows key + E - Runs Windows Explorer.
* Windows key + R - shows the RUN dialog.
* Windows key + F - shows Search window.
* Windows key + Break - shows System Properties box.
* Windows key + TAB - Go through taskbar applications.
* Windows key + PAUSE Display the System Properties dialog box.
* Windows key + U Open Utility Manager.
* ALT + TAB - Cycle through opened applications.
* Hold down CTRL while dragging an item to Copy it.
* CTRL + ESC Display the Start menu.
* ALT + ENTER View the properties for the selected item.
* F4 key Display the Address bar list in My Computer or
* NUM LOCK + Asterisk (*) Display all of the subfolders that are under the selected folder.
· Lock Windows to protect computer :
You can lock Windows to protect the computer when leaving the station easily by creating a shortcut with the path rundll32.exeuser32.dll, LockWorkStation. The Windows key + L is also a shortcut to this feature.
· Edit sysoc.inf to list all software :
To show all software that can be removed from your computer (including protected Windows services), you can manually edit (using notepad for example) the sysoc.inf file located in Windows\inf\. Just remove the word hide next to the software pack.
Note - use this at your own risk. Removing critical components of the system will make Windows instable.
· Windows XP comes with IPv4 and IPv6 :
Windows XP comes both IPv4 and IPv6 support. To enable IPv6, you can install the protocols needed with the command "ipv6 install" in the command-prompt. Then type ipv6 /? to see the options. The installation will not remove the IPv4 protocols so your current configuration will still work.
· Access Task Manager with shortcut :
To access the Task Manager easier, you can make a shortcut that points to %windir%\system32\taskmgr.exe.
· Stop treating ZIP files like Folders :
If you don't want your Windows XP to treat ZIP files like folders, you can disable this component by running regsvr32 /u zipfldr.dll at the command prompt or Run dialog. If you start missing it, you can enable it by typing regsvr32 zipfldr.dll.
· Run program as diffrent user :
You can run a program as a different user. Right click an application and select Run As command.
· Switch users leaving applications opened :
You can switch users leaving the applications opened too (*NOTE* use this only when needed since it could lead to system instability).
Go to Task Manager - processes and end the process explorer.exe. This will end only your session and not all applications. Then go to Applications tab, click New task and type runas /user:domainname\username explorer.exe. A password prompt will appear to login to the desired username. The user's session will start, with all your previously applications running.
I recommend to open first a command-line prompt and type runas /? to see all the options available.
· Rename multiple files in Windows at once :
Rename multiple files in Windows at once. Select them all, right click and select Rename. Enter the desired name. They will be renamed using what you specified, with a number in brackets to distinguish them.
· Task kill feature in Windows :
Windows has a task kill feature similar to Linux. Go to a command prompt and run the command tasklist to see running processes with PID numbers. Then type tskill to end the specific task. This forces an instant closing of the task.
· Edit features with GPEDIT.MSC :
You can edit many features by running gpedit.msc. You can add log on/log off scripts here and many features.
· Edit accounts in the command prompt :
You can edit accounts by running "control userpasswords2" at the command prompt.
· Use systeminfo.exe to see System Information :
You can use the systeminfo.exe command in the command prompt to see System Information, including all Windows updates and hotfixes.
· Disable system services for maximum performance :
There are system services that you can disable to free up the system's load. To access the interface that permits you to make changes to system's services, type services.msc and the command prompt.
This is a list of services that are *usually* useless and can be safely disabled.
* Alerter
* Application Layer Gateway Service,
* Application Management
* Automatic Updates
* Background Intelligent Transfer
* Clipbook
* Distributed Link Tracking Client
* Distributed Transaction Coordinater
* Error Reporting Service
* Fast User Switching Compatibility
* IMAPI CD-Burning
* Indexing Service
* IPSEC Services
* Messenger
* Net Logon
* Net Meeting
* Remote Desktop Sharing
* Network DDE
* Network DDE DSDM
* Portable Media Serial Number
* Remote Desktop Help Session Manager
* Remote Registry
* Secondary Logon
* Smartcard
* SSDP Discovery Service
* Uninterruptible Power Supply
* Universal Plug and Play Device Host
* Upload Manager
* Webclient
* Wireless Zero Configuration
* WMI Performance Adaptor
NOTE: Make sure you don't need them since some applications you're using could depend on them. If you make any application to fail by disabling any of the services, go back and enable it again.
· Repair Windows XP by using the XP installation CD:
If your system failes to start due to an error related to missing HAL.DLL, invalid Boot.ini or any other critical system boot files you can repair this by using the XP installation CD. Simply boot from your XP Setup CD and enter the Recovery Console. Then run "attrib -H -R -S" on the C:\Boot.ini file and delete it. Run "Bootcfg /Rebuild" and then Fixboot.
Monday, November 30, 2009
Easy trace mobile number vehicle & Pincodes
Getting missed calls from unknown number? Blank calls? or just curious?
Now trace any Mobile Number Location , connection type , service provider and more details here. click here
Wondering the vehicle you just overtook belongs to what location ??
Just use the Vehicle Number Trace feature to get the Details using the Vehicle Number.
click here
How about reverse tracing a pin code ?
Use Indiatrace.com 's Pin code trace to find the location of any pin code in India.
click here
How about discovering your IP address details or tracing an IP to its origin location?
Using IP trace feature you can trace IP location and also some interesting info about your own IP address.
click here
Wednesday, November 25, 2009
File Format Converter
Microsoft Office Compatibility Pack for Word, Excel, and PowerPoint 2007 File Formats
http://www.microsoft.com/downloads/details.aspx?FamilyID=941b3470-3ae9-4aee-8f43-c6bb74cd1466&displaylang=en
Office 2003 Service Pack 3 (SP3)
Office 2003 Service Pack 3 (SP3) contains significant security enhancements, in addition to stability and performance improvements.
http://www.microsoft.com/downloads/en/confirmation.aspx?familyId=e25b7049-3e13-433b-b9d2-5e3c1132f206&displayLang=en
Saturday, November 14, 2009
Intel Desktop Boards & Supported processors
Select your Intel® Desktop Board to find a list of Intel processors that are compatible with your board. Please note that you may need a specific hardware revision or a BIOS upgrade to support certain processors.
If you have another manufacturer’s desktop board, you need to check with that manufacturer for processor compatibility information.
http://www.intel.com
If you have another manufacturer’s desktop board, you need to check with that manufacturer for processor compatibility information.
http://www.intel.com
Thursday, October 22, 2009
Easiest way to install linux
Easiest way to install linux and keep windows. It also makes a dual boot so on startup you can check
http://wubi-installer.org/
http://wubi-installer.org/
Monday, October 19, 2009
Government Exam Priparation E-books
UPSCPORTAL.COM - India's Largest IAS, UPSC, Civil Services Aspirants Community.
http://upscportal.com
http://upscportal.com
Monday, October 5, 2009
Disable Mouse Right Click at Desktop and Explorer
If you need to Disable to "Right Mouse Click Menu" on the Desktop, modify this registry key to Create a new DWORD value, called "NoViewContextMenu" and set it according to the value data below.
[HKEY_CURRENT_USER\ Software\ Microsoft\ Windows\ CurrentVersion\ Policies\ Explorer]
Value Name = NoViewContextMenu
(0 = Disable, 1 = Enable)
[HKEY_CURRENT_USER\ Software\ Microsoft\ Windows\ CurrentVersion\ Policies\ Explorer]
Value Name = NoViewContextMenu
(0 = Disable, 1 = Enable)
Thursday, October 1, 2009
Saturday, September 26, 2009
HDD 5MB memory storage in 1956.
 Its a hard disk in 1956....The Volume and Size of 5MB memory storage in 1956.In September 1956 IBM launched the 305 RAMAC, the first computer with a hard disk drive (HDD). The HDD weighed over a ton and stored 5MB of data.
Wednesday, September 23, 2009
Automatically Shut Down Your Windows XP Computer
It’s been said, “Not owning a computer is the most secure computer.” While that’s true, we need to take steps to keep our computer secure.
As a general rule, I like to shut my computer off when I’m away from it for long periods of time. That includes going out for the day or night, as well as going to sleep. Sometimes it’s hard to remember to shut it off. So in this article I’ll show you a way to shut your Windows XP computer off automatically.
Windows XP comes with a program called shutdown.exe and is located in your system32 folder which typically resides under C:\Windows or the main folder where Windows XP was installed.
So let’s set this up quickly:
1. Go to “Start->Control Panel” and click on “Scheduled Tasks” if you’re in “Classic View”. If you’re not in “Classic View” you are probably in “Category View”. In “Category View” you’ll click on “Performance and Maintenance”. Then click on “Scheduled Tasks”. You’ll see the following screen. Double-click the “Add Scheduled Task” icon.
2. Click “Next” on the “Schedule Task Wizard”
3. Click the “Browse” button on the next screen that lists the different applications you can select from (below).
4. Browse to C:\Windows\system32 and select the program shutdown.exe
5. After selecting shutdown.exe, select “Daily” for “Perform this task:”
6. I sleep during the night. That’s why I shut my PC down automagically at 3:00am (below). But, I run some jobs automatically at 1:00am – virus scan and spyware scan, which will be part of a future article. Feel free to adjust this time to fit your schedule.
7. You’ll be asked to provide a user name and password that will be used to run this task (below). Warning: If you don’t know your password, that ok. You can add or change it later. If you don’t provide the correct password, you’ll get an error screen after this step. However, you’ll still be able to finish this process.
8. At this point you’ve successfully added a new schedule task to run at 3:00am. However, let’s click on the “Open advanced properties fro this task when I click Finish” checkbox and click “Finish” so we can add some command line parameters to shutdown.exe
9. Add the following command line parameters as seen below and here – C:\Windows\system32\shutdown.exe -s -t 60 -c “Daily Shutdown” -f. The -s stands for “Shutdown the computer”. The -t 60 stands for “Set timeout for shudown to xx seconds. Feel free to adjust that. You never know when you’re going to be working at 3:00am, so it’s nice to have 60 seconds to prepare for the shutdown. The -c stands “Shutdown comment” which shows up on the screen when the PC is shutting down. And finally the -f stands for “Forces running applications to close without warning”.
10. There’s nothing to change on “Schedule” tab. However, feel free to adjust anything that pertains to your work environment or routine.
11. I also leave the “Settings” tab alone. Again, change what you need to or experiment what suits your work style.
12. This is the final screen that pops up when the task runs. You will have 60 seconds to close applications if you need to.
Friday, September 18, 2009
You receive a "Generic Host Process" error message after you start the computer
You may receive the following error message after you start the computer:
Generic Host Process for Win32 Services ErrorNote This problem only occurs in Microsoft Windows XP Service Pack 2 (SP2).
just download and install this
Windows XP, 32-bit versions
The following file is available for download from the Microsoft Download Center:
Download the WindowsXP-KB894391-x86-ENU.exe package now.
Thursday, September 3, 2009
Increase Shutdown Time So That Processes Can Quit Properly in Windows XP
When Windows shuts down, each running process is given 20 seconds to perform cleanup work by default. If a process does not respond within this time-out period, Windows displays the "Wait, End Task, or Cancel" dialog box for the process, which prompts you to wait for another 20 seconds, stop the process, or cancel the shutdown process.
To prolong this time-out period, you can modify a registry value. The default time-out value
(20 seconds) is stored in the WaitToKillAppTimeout value in the following registry key:
HKEY_CURRENT_USER\Control Panel\Desktop This value is expressed in milliseconds. You can use Registry Editor to modify this value and then restart the computer for the change to take effect.
No More Connections Can Be Made At This Time
If you are using a computer that is running Windows NT or later, you may receive the following error message:
If the specified number of connections has been reached, increase the user limit or set the value to "maximum allowed"
*Start the Registry Editor (REGEDT32।EXE)
*Find the following key:
HKEY_LOCAL_MACHINE\System\CurrentControlSet\Services\LanManServer\Parameters\Users
*If it was, the following registry parameter may need to be increased from a hex value of
0xa (10) to 0xFFFFFFFF
*Exit the Registry Editor.
*Either shut down and restart.
command prompt type:
NET STOP SERVER
And then type:
NET START SERVER
Wednesday, September 2, 2009
Audio Mixer could not be work
Getting this error when trying to change the volume settings in the task bar icon..
The window showes There are no active mixer devices available.?
solution:
Check device mgr - If all are sound devices are working properly
Go to start>control panel>admin tools>services
Scroll down to Windows audio Make sure it is set to Automatic and all dependant programs are enabled.
The window showes There are no active mixer devices available.?
solution:
Check device mgr - If all are sound devices are working properly
Go to start>control panel>admin tools>services
Scroll down to Windows audio Make sure it is set to Automatic and all dependant programs are enabled.
Network is not present or Network not started
1. Open Start >> Run and type “Services.msc” ( without quotes ) and press OK
2. Locate the service named Workstation.
3. Right Click on the workstation service and select properties, you will see a window shown below.
4. Click on the Start button to start the service, starting this service will fix the trouble.
We hope solution provided above will help to fix the trouble, if you have any other solution regarding this problem please share it through comments.
How to fix the IP conflict error on your computer
We can fix this error by refreshing(Release and Renew) the IP address of your computer if you are getting IP address from an external DHCP server.To refresh IP address on your computer you should release and renew IP address from command prompt. To perform that follow the steps below.
1. Release IP addressGo to command prompt and type the command below and press enter.
ipconfig/release
Now the IP address of your computer will be 0.0.0.0 and you will be disconnected from the network.
2. Renew IP addressOn the command prompt window type the command below and press enter.
ipconfig/renew
Now your computer will receive a new IP address from the DHCP server
How to find the IP Address of your Online Chat friend
The steps to find the IP address of your Yahoo Messenger chat friend while chatting with him are:
1. Invite him to share a file in the middle of chat with himIf he accepts the file sharing and starts sharing a file there is connection between your computer and his computer starts. This make your computers in peer to peer mode.
2. Open command prompt and type netstat -n command and press enterNow the list of IP addresses to which your computer has an active TCP/IP connection.
[ I recommend you to perform the same task before establishing the peer to peer connection with your chat friend and note the IP addresses at that time. It will help you to easily identifie your victim's IP address. ]
To get more details than the boring IP address ,you can use the following command.
netstat -a
Note:Please note that while you process the netstat command your computer and his computer should have an active connection. If there is no connection at that time you will get only the Yahoo chat server IP address instead of his IP address.
Find the location of an IP address
Here I am going to list some of the IP Address tracking services. You can track the location of an IP address using any of the services below.
1. DNS stuff
2. http://www.ip-adress.com/
3. whoer.net
4 . http://www.ipaddresslocation.org/
5. http://www.whatismyip.com
6. http://www.ipaddresslocation.org/
7. http://www.geobytes.com/IpLocator.htm?Getlocation
These are some of the free IP address resolution services to find the actual location of that IP address.
An error occurred while trying to share
Some times after running Windows updates or reinstalling the OS we may face issues with sharing folders in our computer over a network. We may get an error message An error occurred while trying to share . The Server service is not started . The reason for failure in sharing folder is due to the stopped state of lanmanserver service on your computer.
How to start lanmanserver service to fix sharing issue To fix the error "An error occurred while trying to share . The Server service is not started " we need to start the lanmanserver on your computer. The steps to start lanmanserver service are..

After starting the lanmanserver you will not face any issues in sharing your folder over a Local Network.
How to start lanmanserver service to fix sharing issue To fix the error "An error occurred while trying to share . The Server service is not started " we need to start the lanmanserver on your computer. The steps to start lanmanserver service are..
1. Click on start and go to command prompt
2. On command prompt type "net start lanmanserver" and press enter.

After starting the lanmanserver you will not face any issues in sharing your folder over a Local Network.
Tuesday, September 1, 2009
Safeguard your family's browsing experience with Content Advisor
As a parent you may have concerns about the content your children encounter as they surf the Web. Internet Explorer 6 helps you safeguard your family's browsing experience with Content Advisor, which can be used to control the Web sites that your family can view. With Content Advisor, you can give your children access to a specific list of Web sites that you allow and prevent them from accessing others. Find out how to use it so you can rest easier.
Activate Content Advisor
To activate Content Advisor, you set yourself up as the Supervisor of Content with a password. Don't lose it!
1.On the Internet Explorer Tools menu, click Internet Options.
2.Click the Content tab, and click the Enable button.
3.In the Content Advisor box, click the General tab, and then click the Create Password button.
4.In the Create Supervisor Password box, type the password you want to use.For solid advice about making a secure password,
5.In the Confirm Password box, type the same password again.Internet Explorer requires this to make sure you haven't made a typing error.
6.In the Hint box, type a hint to help you remember your password, and then click OK.Make sure the hint is one your child won't know the answer to. If you can't come up with something, leave it blank. (But then, of course, you're on your own if you forget the password!)
Create Supervisor Password box
7.Click OK in response to the message about Content Advisor, and then click OK once more.Now every time you bump into Content Advisor's protective walls, you'll need to type the supervisor password to get through.
Be careful! Don't lose your password. To turn off Content Advisor or make any changes whatsoever, you'll need your supervisor password. Store it in a child-proof place away from your computer.
Limit Access to Web Sites
With Content Advisor activated, you can create a list of Web sites that can always be viewed by your family. If someone attempts to access a Web site that is not on your approved list, they will be prompted for the Content Advisor Supervisor password to proceed. To create your list of approved and disapproved Web sites, activate Content Advisor using the instructions above and then follow these steps:
1.On the Internet Explorer Tools menu, click Internet Options.
2.Click the Content tab, and click the Settings button.
3.You will be prompted for the Supervisor password. Enter your password and click OK.
4.In the Content Advisor box, click the Approved Sites tab.
5.In the field for Allow this Web site, type in the Web address that you want to allow or disapprove.
6.Click the Always button to add the site to your list of approved Web sites. Or you can click the Never button to restrict access to the site. To remove a site from your list of approved and disapproved sites, click the site name, and then click the Remove button.
7.When you're finished, click OK.
Approved Sites tab in Content Advisor box
Turn off Content Advisor
1.On the Internet Explorer Tools menu, click Internet Options.
2.Click the Content tab, and click the Disable button.
3.In the Password box, type your supervisor password, and click OK. All users will once again have free access to all sites.
Change Your Supervisor Password
Perhaps someone guessed your password, or perhaps you're simply following good security measures and changing your password often. Whatever the reason, you can change your password by following these steps:
1.On the Internet Explorer Tools menu, click Internet Options.
2.Click the Content tab, and click the Settings button.
3.In the Password box, type your supervisor password, and click OK.
4.In the Content Advisor box, click the General tab, and click the Change Password button.
General tab in Content Advisor box
5.In the Old password box, type the password you're using now.This lets Internet Explorer know that you are authorized to change the password.
6.In the New password box, type the new password.
7.In the Confirm new password box, type the new password again.
Change Supervisor Password box
8.Type a hint to help you remember your new password, and click OK.
Friday, August 7, 2009
Quickly gather MAC addresses in Windows XP with ARP
When securing a wireless Windows XP network, in addition to using Wired Equivalent Privacy (WEP) or Wi-Fi Protected Access (WPA) encryption, you can use Media Access Control (MAC) address filtering.
When you enable MAC address filtering, the wireless access point or wireless router verifies that the network card in the computer requesting access has a MAC address in its filter list before allowing the computer to access the network. This means that you must first obtain the MAC addresses of each client computer. To do so, you might think that you have to manually visit each computer and use the Getmac command.
An easier way to gather MAC addresses is to take advantage of the Address Resolution Protocol (ARP) command. Here’s how:
1. From one computer, use the Ping command to ping each of the other client computers that will connect to the wireless access point or wireless router.
2. Type the ARP command along with the -a parameter:
Arp -a
When used with the -a parameter, the ARP command displays the ARP cache, which stores the IP and MAC addresses of the computers that most recently accessed the system—or in this case, those computers that responded to the Ping command
Shortcut to SHUTDOWN your computer
1. Right click your desktop
2. Create new shortcut
3. Shutdown –s –t 60
4. Then put any name
5. Change the icon
6. Double click the icon your computer will be shutdown with in 60 sec
Do u want to Cancel shutdown - Go to RUN type shutdown –a
2. Create new shortcut
3. Shutdown –s –t 60
4. Then put any name
5. Change the icon
6. Double click the icon your computer will be shutdown with in 60 sec
Do u want to Cancel shutdown - Go to RUN type shutdown –a
Thursday, July 16, 2009
You cannot start the Windows Firewall service in Windows XP SP2
SYMPTOMS
After you install Microsoft Windows XP Service Pack 2 (SP2), you cannot start the Windows Firewall service. Specifically, you experience one or more of the following symptoms:
This problem is caused by a missing or corrupted SharedAccess.reg file. The SharedAccess.reg file represents the Windows Firewall service.
After you install Microsoft Windows XP Service Pack 2 (SP2), you cannot start the Windows Firewall service. Specifically, you experience one or more of the following symptoms:
- Windows Firewall/Internet Connection Sharing (ICS) is not displayed in the Services list in Control Panel.
- Windows Firewall/Internet Connection Sharing (ICS) is displayed in the Services list, but you cannot start this service.
This problem is caused by a missing or corrupted SharedAccess.reg file. The SharedAccess.reg file represents the Windows Firewall service.
Note The Windows Firewall service in Windows XP SP2 replaces the Internet Connection Firewall (ICF) service in earlier versions of Windows XP.
To add the Windows Firewall entry to the registry, follow these steps:
Method 1: Call the "Setup API InstallHinfSection" function to install Windows Firewall
To install Windows Firewall, follow these steps:- Click Start, click Run, type cmd, and then click OK.
- At the command prompt, type the following command line, and then press ENTER: Rundll32 setupapi,InstallHinfSection Ndi-Steelhead 132 %windir%\inf\netrass.inf
- Restart Windows,
- Click Start, click Run, type cmd, and then click OK.
- At the command prompt, type the following command, and then press ENTER: Netsh firewall reset
- Click Start, click Run, type firewall.cpl, and then press ENTER. In the Windows Firewall dialog box, click On (recommended), and then click OK.
Method 2: Add the Windows Firewall entry to the registry
Important This section, method, or task contains steps that tell you how to modify the registry. However, serious problems might occur if you modify the registry incorrectly. Therefore, make sure that you follow these steps carefully. For added protection, back up the registry before you modify it. Then, you can restore the registry if a problem occurs. For more information about how to back up and restore the registry, click the following article number to view the article in the Microsoft Knowledge Base:322756 (http://support.microsoft.com/kb/322756/ ) How to back up and restore the registry in Windows
To add the Windows Firewall entry to the registry, follow these steps:
- Copy the following text into Notepad, and then save the file as Sharedaccess.reg:
-
Windows Registry Editor Version 5.00

[-HKEY_LOCAL_MACHINE\SYSTEM\CurrentControlSet\Services\SharedAccess]

[HKEY_LOCAL_MACHINE\SYSTEM\CurrentControlSet\Services\SharedAccess]
"DependOnGroup"=hex(7):00,00
"DependOnService"=hex(7):4e,00,65,00,74,00,6d,00,61,00,6e,00,00,00,57,00,69,00,\
 6e,00,4d,00,67,00,6d,00,74,00,00,00,00,00
"Description"="Provides network address translation, addressing, name resolution and/or intrusion prevention services for a home or small office network."
"DisplayName"="Windows Firewall/Internet Connection Sharing (ICS)"
"ErrorControl"=dword:00000001
"ImagePath"=hex(2):25,00,53,00,79,00,73,00,74,00,65,00,6d,00,52,00,6f,00,6f,00,\
 74,00,25,00,5c,00,73,00,79,00,73,00,74,00,65,00,6d,00,33,00,32,00,5c,00,73,\
 00,76,00,63,00,68,00,6f,00,73,00,74,00,2e,00,65,00,78,00,65,00,20,00,2d,00,\
 6b,00,20,00,6e,00,65,00,74,00,73,00,76,00,63,00,73,00,00,00
"ObjectName"="LocalSystem"
"Start"=dword:00000002
"Type"=dword:00000020

[HKEY_LOCAL_MACHINE\SYSTEM\CurrentControlSet\Services\SharedAccess\Epoch]
"Epoch"=dword:00002cd0

[HKEY_LOCAL_MACHINE\SYSTEM\CurrentControlSet\Services\SharedAccess\Parameters]
"ServiceDll"=hex(2):25,00,53,00,79,00,73,00,74,00,65,00,6d,00,52,00,6f,00,6f,\
 00,74,00,25,00,5c,00,53,00,79,00,73,00,74,00,65,00,6d,00,33,00,32,00,5c,00,\
 69,00,70,00,6e,00,61,00,74,00,68,00,6c,00,70,00,2e,00,64,00,6c,00,6c,00,00,\
 00

[HKEY_LOCAL_MACHINE\SYSTEM\CurrentControlSet\Services\SharedAccess\Parameters\FirewallPolicy]

[HKEY_LOCAL_MACHINE\SYSTEM\CurrentControlSet\Services\SharedAccess\Parameters\FirewallPolicy\DomainProfile]

[HKEY_LOCAL_MACHINE\SYSTEM\CurrentControlSet\Services\SharedAccess\Parameters\FirewallPolicy\DomainProfile\AuthorizedApplications]

[HKEY_LOCAL_MACHINE\SYSTEM\CurrentControlSet\Services\SharedAccess\Parameters\FirewallPolicy\DomainProfile\AuthorizedApplications\List]
"%windir%\\system32\\sessmgr.exe"="%windir%\\system32\\sessmgr.exe:*:enabled:@xpsp2res.dll,-22019"

[HKEY_LOCAL_MACHINE\SYSTEM\CurrentControlSet\Services\SharedAccess\Parameters\FirewallPolicy\StandardProfile]

[HKEY_LOCAL_MACHINE\SYSTEM\CurrentControlSet\Services\SharedAccess\Parameters\FirewallPolicy\StandardProfile\AuthorizedApplications]

[HKEY_LOCAL_MACHINE\SYSTEM\CurrentControlSet\Services\SharedAccess\Parameters\FirewallPolicy\StandardProfile\AuthorizedApplications\List]
"%windir%\\system32\\sessmgr.exe"="%windir%\\system32\\sessmgr.exe:*:enabled:@xpsp2res.dll,-22019"

[HKEY_LOCAL_MACHINE\SYSTEM\CurrentControlSet\Services\SharedAccess\Setup]
"ServiceUpgrade"=dword:00000001

[HKEY_LOCAL_MACHINE\SYSTEM\CurrentControlSet\Services\SharedAccess\Setup\InterfacesUnfirewalledAtUpdate]
"All"=dword:00000001

[HKEY_LOCAL_MACHINE\SYSTEM\CurrentControlSet\Services\SharedAccess\Enum]
"0"="Root\\LEGACY_SHAREDACCESS\\0000"
"Count"=dword:00000001
"NextInstance"=dword:00000001 - Double-click Sharedaccess.reg to merge the contents of this file into the registry and to create the Windows Firewall entry.
- Restart Windows.
- Click Start, click Run, type cmd, and then click OK.
- At the command prompt, type the following command, and then press ENTER: Netsh firewall reset
- Click Start, click Run, type firewall.cpl, and then click OK.
- Configure the Windows Firewall settings that
- Click Start, click Run, type services.msc, and then click OK.
- In the list of services, locate Windows Firewall/Internet Connection Sharing (ICS). Notice that the status of the service is Started.
- For information about how to use the Services feature, click Help on the Action menu.
Tuesday, June 2, 2009
Add image thumbnails to folders in Windows Explorer
When you are dealing with a folder in Microsoft Windows containing numerous images, it is often very helpful to see thumbnail representations of those images in the Windows Explorer display. This built-in functionality is available in both Windows XP and Windows Vista, but how you turn the feature off and on is slightly different for each version.
One caveat for the resource-sensitive: turning on the thumbnail feature will increase the amount of resources being used by the operating system. Those little thumbnails take up space on the hard drive and in memory when they are being displayed. Depending on your system, the available resources, and the number of images involved, you can quickly bog down your PC if you are not careful. This is why many users will be interested in this tip for the opposite reason — they want to know how to turn off thumbnail creation in Windows.
Windows XP
Open Windows Explorer and navigate to the folder of images for which you would like to see thumbnails. On the Windows Explorer menu, click Tools | Folder Options to get to the Control Panel. Click the View tab, as shown in Figure A.
Figure A

XP Folder Options - View
Under the Files And Folders section, you will see the Do Not Cache Thumbnails check box. If this box is checked, there will be no thumbnails cached on your hard drive. So if you want thumbnails, you will want to uncheck it. Click OK after you’ve made your selection.
To start seeing thumbnails, you have to change views in Windows Explorer. On the menu bar, click View | Thumbnails, and Windows will replace the normal file icons with thumbnails of the images. Windows will also create a new file in that folder called Thumbs.db, where the thumbnail information is stored, as shown in Figure B.
Figure B

Thumbnails - XP
The Thumbs.db file will be created in every folder you designate to display thumbnails. To apply your changes to all Windows Explorer folders, navigate to Tools | Folder Options and click the View tab. From there, make your changes and then click the Apply To All Folders button before you click OK.
Windows Vista
Turning on the thumbnail feature is slightly different in Windows Vista. Open Windows Explorer and navigate to the images folder where you would like to see thumbnails displayed. On the menu, click the Organize tab and then Folder And Search Options. On the ensuing control applet, click the View tab, as shown in Figure C.
Figure C

Vista Folder Options - View
Under Files And Folders, uncheck the Always Show Icons, Never Thumbnails check box. That will turn on thumbnails for that particular folder. If you want to apply the change to all folders, you should click the Apply To Folders button. Click OK to finish the process.
Just as you did in Windows XP, for Vista you have to take one more step to actually reveal thumbnails in Windows Explorer. On the Explorer menu, click the down arrow next to Views and select a view other than List or Details (see Figure D).
Figure D

Thumbnails - Vista
Windows Vista has an additional way to view thumbnails in Windows Explorer. Click Organize | Layout and choose to add the Preview Pane. That selection will add an area to the right of the display where a larger thumbnail of each image will be displayed as you highlight it, as shown in Figure E.
Figure E

Preview Pane - Vista
Once again remember the caveat: thumbnails take up resources. Be careful how you use them. And if there comes a time when you want to turn them off, just do the opposite of the procedures described here. In Windows XP, you would also want to delete the Thumb.db file in each folder.
Monday, June 1, 2009
Windows Recovery Console Commands
The Windows Recovery Console is used to obtain access to your computer without starting the Windows graphical user interface. With the Windows Recovery Console, you can:
- Use, copy, rename, or replace system files and folders.
- Enable or disable services or device startup for the next time that you boot your computer.
- Repair the file system boot sector or the Master Boot Record.
- Create and format partitions on drives.
Here are the available commands that can be used with the Windows Recovery Console.
ATTRIB
Use the attrib command with one or more of the following parameters to change the attributes of a file or a folder:
BATCH
batch inputfile [outputfile]
Use this command to run commands that are specified in a text file. In the command syntax, inputfile specifies the text file that contains the list of commands to be run, and outputfile specifies the file that contains the output of the specified commands. If you do not specify an output file, the output appears on the screen.
BOOTCFG
Use this command for boot configuration and recovery.
CD and CHDIR
Use the cd and chdir commands to change to a different folder.
CHKDSK
chkdsk drive /p /r
The chkdsk command checks the specified drive and repairs or recovers the drive if the drive requires it.The command also marks any bad sectors and it recovers readable information.
CLS
Use this command to clear the screen.
COPY
copy source destination
Use this command to copy a file.
DEL and DELETE
del drive: path filename
delete drive: path filename
Use this command to delete a file.
DIR
dir drive: path filename
Use this command to display a list of files and subfolders in a folder.
DISABLE
disable servicename
Use this command to disable a Windows system service or driver.
DISKPART
diskpart /add /delete device_name drive_name partition_name size
Use this command to manage the partitions on your hard disk volumes.
ENABLE
enable servicename start_type
You can use the enable command to enable a Windows system service or driver.
EXIT
Use the exit command to quit the Recovery Console.
EXPAND
expand source [/F:filespec] [destination] [/y]
expand source [/F:filespec] /D
Use this command to expand a file
FIXBOOT
fixboot drive name:
Use this command to write the new Windows boot sector code on the system partition.
FIXMBR
fixmbr device name
Use this command to repair the MBR of the boot partition.
FORMAT
format drive: /Q /FS:file-system
Use this command to format the specified drive to the specified file system.
LISTSVC
The listsvc command lists all available services, drivers, and their start types for the current Windows installation.
LOGON
The logon command lists all detected installations of Windows and then requests the local administrator password for the copy of Windows that you want to log on to.
MAP
map arc
Use this command to list drive letters, file system types, partition sizes, and mappings to physical devices.
MD and MKDIR
The md and mkdir commands create new folders.
MORE
more filename
Use this command to display a text file to the screen.
RD and RMDIR
Use rd and rmdir commands to delete a folder.
REN and RENAME
Use the ren and rename commands to rename a file.
SET
You can use the set to display or modify four environment options.
SYSTEMROOT
The systemroot command sets the current working folder to the %SystemRoot% folder of the Windows installation that you are currently logged on to.
TYPE
type filename
Use the type command to display a text file.
Do You Really Want To Improve Your Typing Speed?
How to Improve my Typewriting Skill?
It is very easy to type in computer keyboard than traditional typewriter.But only few people know the rules of Typewriting.Others are randomly picking a key on their keyboard.There is nothing wrong in it.
Because they practiced like this.One of my friend who is having 12+ years of experience in Information technology field.He also doesn't know Rules of Typewriting.But he is typing rapid fast. His speed is > 75 WPM.Do you want to know the rules for Typing?
Do you really want to improve your typing skill?
Here is the 3 web site links for you. Go and Enjoy.
http://www.powertyping.com/
http://www.artypist.com/en/typing/index
http://www.software-giant.com/software/v_0_3/
50+ Microsoft Word Shortcuts
Shortcut Keys Description
Ctrl + A Select all contents of the page.
Ctrl + B Bold highlighted selection.
Ctrl + C Copy selected text.
Ctrl + D Open the font dialogue box.
Ctrl + E Aligns the line or selected text to the center of the screen.
Ctrl + F Open find box.
Ctrl + G Open find and replace box.
Ctrl + H Also opens find and replace box.
Ctrl + I Italicise highlighted selection.
Ctrl + J Justify (spread) the text across the page.
Ctrl + K Insert link.
Ctrl + L Aligns the line or selected text to the left of the screen.
Ctrl + M Indent the paragraph.
Ctrl + N Open a new document.
Ctrl + O Open a document stored on your hard drive.
Ctrl + P Open the print window.
Ctrl + R Aligns the line or selected text to the right of the screen.
Ctrl + S Saves the current document.
Ctrl + U Underline highlighted selection.
Ctrl + V Paste contents of clipboard.
Ctrl + W Closes the current document.
Ctrl + X Cut selected text.
Ctrl + Y Redo the last action performed.
Ctrl + Z Undo last action.
Ctrl + Shift + F Change the font.
Ctrl + Shift + > Increase selected font +1pts up to 12pt and then increases font
+2pts.
Ctrl + ] Increase selected font +1pts.
Ctrl + Shift + < style="margin-top: 0px; margin-right: 0px; margin-bottom: 0px; margin-left: 0px; padding-top: 0px; padding-right: 0px; padding-bottom: 0px; padding-left: 0px; ">decreases font by +2pt.
Ctrl + [ Decrease selected font -1pts.
Ctrl + Shift + * View or hide non printing characters.
Ctrl + Moves one word to the left.
Ctrl + Moves one word to the right.
Ctrl + Moves to the beginning of the line or paragraph.
Ctrl + Moves to the end of the paragraph.
Ctrl + Del Deletes word to right of cursor.
Ctrl + Backspace Deletes word to left of cursor.
Ctrl + End Moves the cursor to the end of the document.
Ctrl + Home Moves the cursor to the beginning of the document.
Ctrl + Spacebar Reset highlighted text to the default font.
Ctrl + 1 Single-space lines.
Ctrl + 2 Double-space lines.
Ctrl + 5 1.5-line spacing.
Ctrl + Alt + 1 Changes text to heading 1.
Ctrl + Alt + 2 Changes text to heading 2.
Ctrl + Alt + 3 Changes text to heading 3.
Ctrl + F1 Open the Task Pane.
F1 Open Help.
Alt + Ctrl + F2 Open new document.
Ctrl + F2 Display the print preview.
Shift + F3 Change the text from upper to lower case or a capital letter at the
beginning of every word.
Shift + Insert Paste.
F4 Repeat the last action performed.
F5 Open the find, replace, and go to window in Microsoft Word.
Ctrl + Shift + F6 Opens to another open Microsoft Word document.
F7 Spell and grammar check selected text and/or document.
Shift + F7 Runs a Thesaurus check on the word highlighted.
F12 Save as.
Shift + F12 Save.
Ctrl + Shift + F12 Prints the document.
Alt + Shift + D Insert the current date.
Alt + Shift + T Insert the current time.
Ctrl + A Select all contents of the page.
Ctrl + B Bold highlighted selection.
Ctrl + C Copy selected text.
Ctrl + D Open the font dialogue box.
Ctrl + E Aligns the line or selected text to the center of the screen.
Ctrl + F Open find box.
Ctrl + G Open find and replace box.
Ctrl + H Also opens find and replace box.
Ctrl + I Italicise highlighted selection.
Ctrl + J Justify (spread) the text across the page.
Ctrl + K Insert link.
Ctrl + L Aligns the line or selected text to the left of the screen.
Ctrl + M Indent the paragraph.
Ctrl + N Open a new document.
Ctrl + O Open a document stored on your hard drive.
Ctrl + P Open the print window.
Ctrl + R Aligns the line or selected text to the right of the screen.
Ctrl + S Saves the current document.
Ctrl + U Underline highlighted selection.
Ctrl + V Paste contents of clipboard.
Ctrl + W Closes the current document.
Ctrl + X Cut selected text.
Ctrl + Y Redo the last action performed.
Ctrl + Z Undo last action.
Ctrl + Shift + F Change the font.
Ctrl + Shift + > Increase selected font +1pts up to 12pt and then increases font
+2pts.
Ctrl + ] Increase selected font +1pts.
Ctrl + Shift + < style="margin-top: 0px; margin-right: 0px; margin-bottom: 0px; margin-left: 0px; padding-top: 0px; padding-right: 0px; padding-bottom: 0px; padding-left: 0px; ">decreases font by +2pt.
Ctrl + [ Decrease selected font -1pts.
Ctrl + Shift + * View or hide non printing characters.
Ctrl +
Ctrl +
Ctrl +
Ctrl +
Ctrl + Del Deletes word to right of cursor.
Ctrl + Backspace Deletes word to left of cursor.
Ctrl + End Moves the cursor to the end of the document.
Ctrl + Home Moves the cursor to the beginning of the document.
Ctrl + Spacebar Reset highlighted text to the default font.
Ctrl + 1 Single-space lines.
Ctrl + 2 Double-space lines.
Ctrl + 5 1.5-line spacing.
Ctrl + Alt + 1 Changes text to heading 1.
Ctrl + Alt + 2 Changes text to heading 2.
Ctrl + Alt + 3 Changes text to heading 3.
Ctrl + F1 Open the Task Pane.
F1 Open Help.
Alt + Ctrl + F2 Open new document.
Ctrl + F2 Display the print preview.
Shift + F3 Change the text from upper to lower case or a capital letter at the
beginning of every word.
Shift + Insert Paste.
F4 Repeat the last action performed.
F5 Open the find, replace, and go to window in Microsoft Word.
Ctrl + Shift + F6 Opens to another open Microsoft Word document.
F7 Spell and grammar check selected text and/or document.
Shift + F7 Runs a Thesaurus check on the word highlighted.
F12 Save as.
Shift + F12 Save.
Ctrl + Shift + F12 Prints the document.
Alt + Shift + D Insert the current date.
Alt + Shift + T Insert the current time.
To remove Autorun.inf
Registry Disabled to enable
Task manager Disabled to enable
Enable Folders options
Enable run
Enable command prompt
Task manager Disabled to enable
Enable Folders options
Enable run
Enable command prompt
It is disable auto play option
Write protecting to ur pen drive
Thursday, May 28, 2009
Recover a damaged Windows XP user profile
A user profile on a Microsoft Windows XP system contains all the files and settings needed to configure your work
OR:
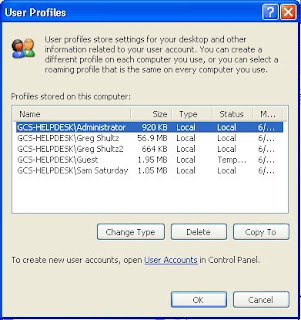

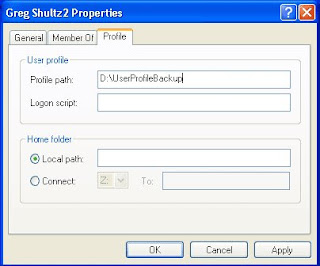
OR:
Must be an administrator
Keep in mind that in order to perform the recovery operations discussed in this article, you must be working from
Backing up your data
The first thing that you’ll want to do is make sure that the data in your original account is safe and then back it up.
To begin the back up operation, launch Windows Explorer and navigate to the C:\Documents and Settings folder.
Then, locate and open your original account folder. At this point, you should see all the files and folders in your
original user profile, as shown in Figure A.

Figure A
You can open your original account folder and back up all the files and folders containing crucial data.
You’ll then want to copy your crucial data files to another location. For example, you’ll definitely want to copy the
Once you’ve backed up your crucial data files, you can proceed with the recovery operation knowing that your
data is indeed safe and sound.
Using System Restore
The first thing to try when attempting to recover a damaged user profile is a System Restore operation. As you
System Restore, you’ll see the Welcome To System Restore page and will simply click Next. On the Select A
Restore Point page, select the last restore point created before the damage to the user profile became apparent,
then click Next. When you’re prompted to confirm the operation, click Next and the restore operation will begin.
To undo the System Restore operation, log on to the working account and launch System Restore. When you see
Copying your user profile
In this user profile recovery technique, you’ll attempt to revive the user profile by creating a new account and,
To begin, acces s the Control Panel and launch the User Accounts tool. Next, select the Create A New Account
Now, open the Start menu, right-click My Computer, and select Properties. When you see the System Properties
dialog box, select the Advanc ed tab. Then, locate and click the Settings button in the User Profiles s ection. You’ll
now see a User Profiles dialog box that looks lik e the one shown in
Figure B.

You’ll use the User Profiles tool to copy your old user profile to the new account.
In this example, I’ll be copying the user profile from the Greg Shultz account to the Greg Shultz2 account. I’ll
Figure C

At this point, you’ll see the path to your new acc ount in the Copy To d ialog box.
Once the copy operation finishes, close the User Profiles dialog box and the System Properties dialog box, then
Moving to a new user profile
In this user profile recovery technique, you’ll move to a new user profile by creating a new account and,
To begin this operation, launch Windows Explorer and navigate to the C:\Documents and Settings folder. Then,
In the case of
Shultz’s Documents folder to the C: \Documents and Settings\Greg Shultz2\Greg Shultz2’s folder.
In addition, you’ll want to copy the contents of the Favorites, Outlook Express, and Address Book folders if you’re
using that e-mail program, or the Outlook folder. You may also want to copy the contents of Cookies, Templates,
Be careful not to copy any files that are spec ifically related to the operating system, as any one of those files
could be the culprit in the case of the corrupted user profile. For example, you definitely won’t want to copy
Ntus er.dat, Ntuser.pol, or Ntuser.ini from your old user profile to your new one.
When you’re finished copying files, log out of the working profile, and then log on to your new user profile. When
Cleaning out your old profile
Once you’ve totally moved into your new user profile, you’ll want to permanently delete your old, corrupted us er
The automatic user profile backup technique
So you won’t ever have to go through all these troubleshooting steps should the user profile ever get corrupted
pressing [Windows]-R and typing compmgmt.msc in the Open text box. Then, drill down to System Tools \Loc al
Users and Groups\Users folder. Next, double-click on your account name and select the Profile tab. Then, type
the path to the backup in the Profile Path text box, as shown in Figure D.

You can configure Windows XP to automatically back up the local user profile each time you log off.
Subscribe to:
Posts (Atom)